Showing posts with label Fabric. Show all posts

8.17.2010

Couch Pillows turned Floor Cushions

When you buy a couch, you often get a bunch of coordinating throw pillows. I don't really like to use the term "coordinating" when it comes to these freebie pillows, because they often have a random pattern on the back. Such was the case with our throw pillows. We bought a brown couch, and the pillows that came with it were these beauties:
Okay, maybe the stripes are fine, and in fact the colors aren't horrible, they just aren't my color scheme. Another thing is that I much prefer a down pillow insert. These babies were stuffed with fiberfill fluff, so they're shapes weren't too fab. So, what is one to do with these big pillows that take up tons of room? There were four big, fluffy, uncoordinating pillows just sitting there taking up space.

I've been wanting some floor poufs for the playroom for a while now. I had considered these Land of Nod cushions, but then it came to me... two of these big fluffy throw pillows stack up to be kind of like a floor cushion. I unzipped the pillow covers (Freecycled the pillow covers) and found that the fluff was free flowing, and not in a pillow form. This would be perfect for removing and filling my own pillow pouf. From four pillows I made these:
The kids absolutely love them. My almost-one-year-old loves wrestling them and attempting to pull them around. They even make good bowling balls to rolls across the floor (and they may or may not knock over three-year-olds!) That same three year old sits on them to read books, pulls them up to a chair and uses them as a foot rest, and I myself use them as a back/neck rest when we are playing or reading.

I bought my heavy weight decorator fabric from Calico Corners for $2.99/yd. I bought 2 yards and made 2 cushions with enough left over for a throw pillow. So $2.99 for the fabric + 2 free pillows worth of stuffing = $2.99 per cushion. I'd say that's pretty darn good compared to the alternative price.


Here's the basics on how I did it.

Materials:
2 yards of home decor fabric it is usually wider at 60 inches or so (you need the length of two yards to get the full circumference of the pillows.)
Tinsy bit of contrasting fabric for pull handles (optional)
Fiberfill

Brief instructions per pillow:
I didn't take pictures as I went because I wasn't sure if it was going to work.

1. Make a 21" circle pattern for the cushion top and bottom. I used freezer paper taped together for mine.
2. Cut out one long rectangle measuring 10.5" x 66"
* make sure the layout of the large rectangles and the circles lays out to allow for each piece. I cut my two rectangles (for two pillows, if you're making one, you only need one rectangle) along the selvedge down the length of my two yards. Then the circles were staggered on the remaining fabric.
3. Cut two 21" circles per pillow.
4. Cut one 4" x 8.5" rectangle for pull strap or constrasting fabric or same fabric.

Very brief sewing instructions:

1. To create strap, sew 1/2" down length of small 4" x 8.5" rectangle with right sides together. Press seam open and sew down only one end. Turn right side out and fold under open edge. Pin to middle of 10.5" x 66" circle and sew both ends securely to fabric.
2. Fold under one short end of large rectangle and sew rectangle to circle circumference edge with right sides together using a 1/2" seam allowance. Overlapping ends at the end. Strengthen seam by sewing again around circle 1/8" from previous seam
3. Sew overlapped rectangle ends together using a double top-stitch.
4. Sew other side of rectangle to the other circle using a 1/2" seam allowance, leaving an opening to turn and stuff. Strengthen seam and sew around circle again. Backstitching at beginning and end.
5. Flip right side out, and stuff until full and firm
6. Handstitch the opening closed.
Enjoy!

8.03.2010

Printing on Fabric

Did you know that you can print on your own fabric without buying those expensive packages of printable fabric from the store?

I made this project a year ago and found it in my files the other day so I wanted to share this simple tip with you.
I wanted to have some words on fabric to make a pillow for my daughter, but I didn't want to have to stencil or anything. I wanted quick, easy and simple. Here's how I did it:

Materials:
Freezer paper
Lightweight fabric

Instructions:
1. cut your freezer paper to an 8 1/2"  x 11" size (yes, just like a standard sized sheet of paper.)
2. iron your freezer paper to the wrong side of your fabric, with the waxy side of your freezer paper facing down. about 30 seconds on all areas of your freezer paper or until the waxy side has melted and adhered to your fabric.
3. cut your fabric down to the size of your freezer paper.
4. feed your freezer papered fabric into your printed and print as normal.
5. after done printing, let it sit to dry for a few minutes.
6. heat set your ink with a hot, dry iron- no steam.
* your printed fabric may be affected by water, so don't get it wet or the ink may run.

7.26.2010

Ladybug Party: Tutu

My daughter's third birthday party theme was ladybugs. Lately, she's been a bug lover, so lady bugs seemed befitting for our little lady. And what does every little lady need on their birthday? A tutu of course! I made this simple tutu spending very little money (mine cost around $6) and very little time- perfect when you have lots to do!

Front:

Back:

Just in case you wanted instructions here they are. Sorry that I didn't take pictures because I wasn't thinking about giving instructions.

Materials:
4 yards of red tulle
2 yards of black tulle
1/2 inch elastic
red thread
ribbon

Instructions:

1. align the selvedge edges and cut your 4 yards of red tulle in half to make 2 two-yard pieces. Stack the two sections on top of each other and then on top of the black tulle. All layers should still be folded and 2 yards wide. Pin the layers together around the edges to keep them aligned and neat.

2. Cut along all of the folds so that each layers is now it's own piece and not connected with a fold. With black tulle layers on top of stack (or in whichever stacking order you want), fold in half lengthwise (black tulle will be sandwiched in between several layers of red.) Pin along the fold to hold all of the layers together.

3. Set your sewing machine to a short stitch length. Sew close to the folded edge (about 1/8th to 1/4th of an inch away from edge.) Now sew another line 5/8 of an inch away from that first seam. Be sure to backstitch.

4. Now that it's sewn you can remove all pins. Lay out and trim to make all the layers even on bottom edge and two side edges. (Or you can just leave it for a more wild look.)

5. Feed elastic through the casing you created. Adjust elastic to fit the child around their waste. Secure elastic by sewing across both ends.

6. Cut 2 pieces of ribbon 20 inches long each piece. Heat seal the ribbon edges to prevent fraying. Sew the end of each ribbon piece to the casing edges over where you sewed the elastic in. DONE!
Now tie it on your child and twirl the day away!

11.30.2009

ReFashion

Look at these pieces a friend gave to me:


She didn't want to let these beautiful fabrics just get tossed- I'm glad because they are gorgeous! The velvet is so heavy and plush- yum! Free fabric goes right along with my theme of a handmade holiday. Just you wait and see what it's becoming!!

8.05.2009

A Swimmy Success

A couple of weeks ago, my friend enlisted my sewing skills to create a modest swimsuit top. I have to admit, I was scared of the thought, because I've always heard that swimsuit fabric was intimidating and hard to work with. She found some fabric she loved, and there was no turning back- I was onboard and excited for this new challenge.
(found at the amazing Spandex World Inc.)
We decided on the look- lots of fun ruching, halter straps, and longer length. I made one draft, that looked great, but was sized wrong (who knew how much stretch I'd have to take into account?!) I took a few measurements, and draft two turned out perfect!! Let me just say that it looks FAB on it's happy new owner who will be putting it to great use on her vacation this week!
(J- I hope you don't hate me for using this pic... I stole it from your blog...)
Now I'm already thinking about next summer and my need for some cute non-maternity swimwear.

8.04.2009

On Cloud9

Cloud9 Fabrics that is. Check out their beautifully coordinated and cheery My Happy Garden collection:

7.15.2009

Fabric Love: Oh Boy!

I promised myself that I wouldn't buy any more fabric until the ones that I have get put to use. Here are some of the fabrics collections on the top of my list to buy once I clear out some fabric space on my shelves:
Robots by David Walker for FreeSpirit:
Oh Boy! by David Walker for FreeSpirit

Little House by Annette Tatum for FreeSpirit

With the coming of Little Brother, I am constantly drawn to cute boy fabrics. We'll see if I hold to my own rules- sometimes I can't help myself.

4.06.2009

It Pays Off...

To enter giveaways! I was chosen as the winner in A La Mode's Heather Ross fabric giveaway. The winner got to choose 3 of 6 fabrics in H.R.'s Lightening Bug Collection, which is retired and hard to find. I have always loved this collection and find the blue versions perfect for the little one growing inside of me! Here are the three fabrics I chose:

Make sure you go enter A La Mode's 2nd Giveaway to win the remaining three fabrics! She also has an Etsy shop where she sells receiving blankets, loveys, quilts, and other great creations- check it out!

2.09.2009

Quilting for Ki-Ki

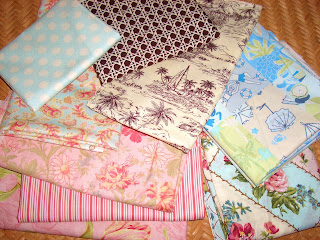
Just bought these fabrics to make K's big girl bed quilt. They are even prettier in person than on the computer screen, plus they are so soft! Wish me luck. I'll definately post a picture of the finished product!

5.30.2008

Favorite Fab Fabric!

Here are some of my favorite new fabric purchases! Don't they look so fun, funky, summery, and youthful?! I can't wait to create something with them... I have already put some of them to use, but they are a secret for now... Oh, I know the suspense is already killing you!


All fabric was purchased at my favorite local fabric shop, The Cotton Shop, and online at Z&S Fabrics.

Amazon Affiliate