Showing posts with label Holiday. Show all posts

4.13.2017

Resurrection Easter Eggs

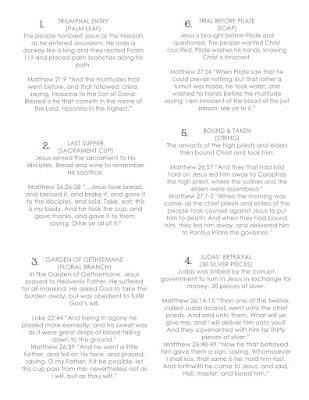
This resurrection easter egg countdown has been done and posted about all over the internet. This is just my version combining some of those I found. I chose the events I wanted to touch on most, but there are tons of options out there! We made these for Activity Days and the girls can go home and teach them to their families.

These are the little items included in 11 of the 12 eggs, the 12th egg is empty to represent Christ's resurrection and the empty tomb.

We numbered each egg and included a printed quote and scripture along with the item in each egg.

Then we put them in a cute bag and tied it up with a resurrection picture card.

These make great gifts for family, friends and neighbors! Below is a free printable of the files I made and printed. Again, they are a compilation of others across the internet, so I take no credit for this idea!


11.01.2016

Halloween

With our home being on the market during October, I didn't want to go all out with my Halloween decor. I thought spider webs and bats might scare off potential buyers. Instead, I kept our decor very simple and pretty.

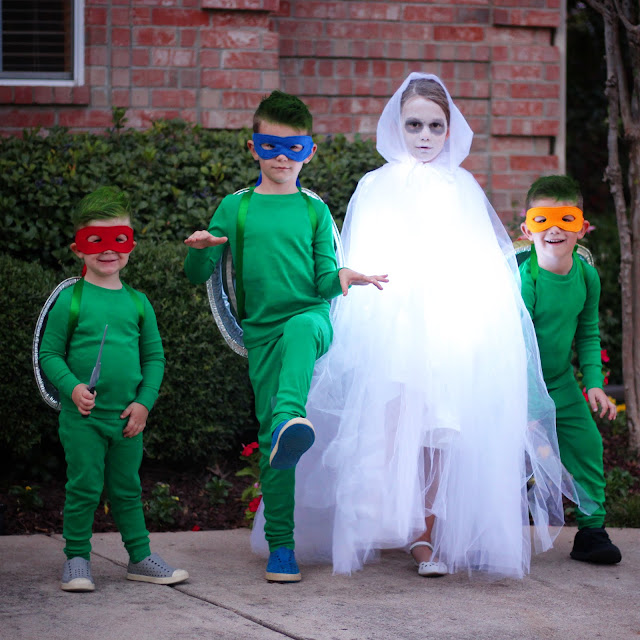
We did however, have fun with our Halloween costumes! I normally like to try and coordinate the whole family, but the kids wanted different things, so I just let them be what they wanted to be.
The boys wanted to be Teenage Mutant Ninja Turtles. This costume was super easy to create. I bought green pj tops and pants from Primary.com. These can double as actual pajamas after Halloween- win-win! I made felt ninja masks, and made turtle shells out of large roasting pans spray painted green.

{This post contains affiliate links below, which means I receive compensation if you make a purchase using this link. I was not provided free product, and my opinion is my own, but I only recommend products I have used and LOVE, and hope you will too!}

I also sprayed their hair green with THIS.

Raphael:

Michelangelo:

Leonardo:

My daughter wanted to be something creepy. We settled on a ghost and came up with my favorite costume to date! I made a cape out of several layers of tulle (I basically followed this TUTORIAL from Martha Stewart for the cape,) She wore it over a white old fashioned night gown I made as well. I painted her face to make her look dead and she was thrilled!
**Keep scrolling for the best part!!**
And apparently even ghosts like a little donut challenge!
When nightfall came, this ghost was back to her spooking duties:


How'd we get her to glow? I used THESE LED battery operated lights that we wrapped around under her tulle cape. She was the hit of all our Halloween festivities!

As for the grown-ups, we dressed up as Sheriff Longmire and a local native. If you haven't watched the show, you need to!
Getting one of our kids to take our picture was easier said than done.

It was a successful Halloween season! The best part was that we had a showing for our home on Halloween nigh, and they ended up making us an offer and buying! Maybe those simple flowers and pumpkin sealed the deal ;)


2.11.2016

Teacher Valentine's Gift

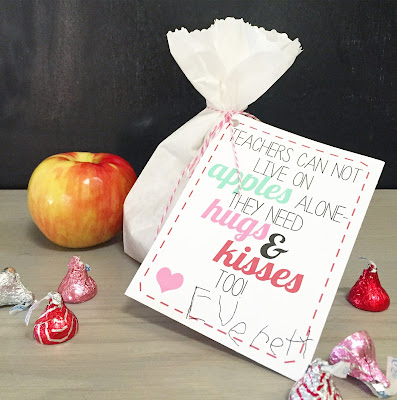
I created this little tag a while ago just as a random thank you for all the wonderful teachers in our lives, but thought it would be cute as a teacher Valentine's gift as well. 

I changed the colors up a bit and it looks super cute with Valentine's red, pink and silver hugs and kisses. To download simple click on the image and save to your computer!

2.12.2013

Valentines 2013

Last year my daughter exchanged Valentine's Day Cards with her little preschool group friends. There were 4 little girls in the group, and the Valentines were girly and fun. 

This year in Kindergarten, she gets to have a fun Valentine's Day party and exchange Valentines with her classmates. If you go to the store, there are the prepackaged cards or candy valentines. If you know me, completely store bought, just ain't my thing. Then, you go to Pinterest and there are TONS of cute ideas, but still a majority involve candy. Once again, too much candy just ain't my thing. (Side note: We have a "treat basket" at our house. We go through candy slowly around here, and still have Halloween and Christmas candy in our treat basket. So I had no desire to add to the candy intake. Cheesecake, ice cream and brownies are more than welcome though, and don't last long.) I figured a majority of the Valentines the kids will get will have candy, so they wouldn't be sad if ours didn't. Instead we came up with this:

And, of course, I had to design a little printable to go with it. Click on the image below to download it for yourself. Then, simply print at home, cut out, punch a hole at the top and bottom, have your child sign it, and slip a silly straw through the holes.
(File has been updated since the original post. Enjoy!)


We couldn't forget about her teacher! Her teacher's favorite snack is goldfish. So I had to copy the popular "FISH" themed Valentines out there, and designed this one:

Click on the image below to download your free printable. I made it print 4 to a page in case your child has more than one teacher to share their love with.


What are you doing for Valentine's Day?

12.14.2012

JOY Blocks

A friend of mine was put in charge of the decorations for our church Christmas party. She quickly called me on board to come up with how to decorate the tables... all 30 of them!! With the budget we were given and the amount of tables we had to decorate, our options were limited. I could have crafted things for each table, but I wasn't really feeling up to the task of making 30+ handcrafted items per table (and craft supplies can be pricey too...) We just decided to make it easy, but still cute. We set out red and white poinsettias on each table, along with wood JOY blocks.

I followed the same basic idea as when I made the USA blocks for my Patriotic Mantle.

This time I bought 2"x3" boards instead of 2"x4" since the letter stamp I was going to use was tall and skinny and I didn't need the 4" width. I was just going to load the 3 boards into my van and cut them at home, but the friendly workers at HD offered to do it there.


69 blocks later, I was headed home. I then sanded all 12 edges of each block. Do the math... that's 828 edges. My hands were red, and I had two blisters afterwards. They I had my friend paint half of the blocks, and I (meaning I roped my hubs into helping) painted the other half. Once they were all painted I stamped J O and Y onto the blocks. DONE. I could have sanded and distressed the edges, but I had NO desire to sand those 828 edges again. (So much for keeping my crafting to a minimum.)


The morning of the party, my daughter and I went over to the church to decorate. We spread out the table cloths, put out the poinsettias, and then put the JOY blocks out. My daughter loved that part.


It was simple but nice. The best part was that we sent the poinsettias and blocks home with people to be given to neighbors, needy, or anyone to whom we felt like spreading some JOY!

11.08.2012

Turkey Dice Game

My Gingerbread Dice Game printable has been one of my post successful printables to date with over 13,000 downloads! I've had a gazillion email request for more varieties of this game, so here we go. First up, since it is November, a Turkey Dice Game printable. Once again, I did not come up with the idea of this game, just the printable so we don't have to draw one out each time the kiddos want to play.


Click HERE to download the PDF of this printable. It prints on a standard 8.5" x 11" paper.


Here are the rules for how we are going to play:

Going around in a circle, each player rolls the dice when it's their turn. 
The player then gets to color in one of the segments with that number on it. Then, it's the next player's turn to roll and color.
The first player to color in their while turkey wins!

Have fun playing!


***Reminder, this printable is copyright of Kinzie's Kreations. This is for personal use only. Do not print to sell, or sell the PDF file. Thanks!***

10.01.2012

October Entry Table

It's the first day of October, one of our favorite months of the year, and we've got some Halloween decor to help us get even more excited. Here is my new entry table sprinkled with a few Halloween items. Before this year, I had maybe two festive decorations, I've been trying to be better this year, since my kids are really getting into the holiday.

I spotted the most adorable Halloween subway art on the wall of Jen from Tatertots & Jello in her Halloween Plate Wall post. After asking her where she got it, of course she admitted that she made it. So, since I couldn't just buy it, I too had to make one. I worked with a friend of mine to design the vinyl then she cut it for me. I had a board already the perfect size in my scrap stash. I painted it up, distressed it, and slapped on the vinyl. I painted a circle of chalkboard paint for the countdown section, and was done.


I don't own but one pumpkin. It's ugly, half the paint is chipping off, and I couldn't stand to bring it out of the box this year. So instead, I went to my fabric stash, picked out a few coordinating ones, and make some fabric pumpkins. They are fun and colorful, and probably the best thing about them, is the littles can pick them up, toss the around, lay on them, and I don't have to worry about them chipping, cracking, or breaking. I basically followed the tutorial HERE to make the pumpkins. 


I sprinkled a few glitter spiders about, and we are ready for Halloween. Okay, I have to admit, I'm working on a table runner too...

9.19.2012

A Ghosty Pillow

We love Halloween, mostly because it ushers in all of the holidays. I don't love the spooky aspect of Halloween, but the kids enjoy a little ghost, bat, or spider here and there. I went into my fabric stash, grabbed a pillow form I had in the closet, and made this friendly little ghost pillow.

 I kept the colors neutral, making it match the rest of my home decor a bit better.

Subtly spooky!

Sorry there isn't an in-depth tutorial, but I didn't take pictures as I went. But here's what I did: I cut out a simple ghost silhouette, used heat n' bond to adhere it to the fabric for the front side of the pillow, zig-zag stitched around the ghost, and made an envelope closure pillow cover. Here's a great tutorial from Freshly Picked for how to make an envelope pillow cover.

9.18.2012

Simple Pumpkin Canvas

Today the weather has been amazing. It's cool, there's a light breeze, and this just feel more like fall. I told myself I wasn't going to decorate for fall until October arrived, but with the weather today, I couldn't hold out any longer. I went up in the attic and pulled down what little we have for Fall, Halloween, and Thanksgiving. It was minimal at most. So I rummaged through my wood scrap pile and pulled out some leftover orange burlap to whip up this quick little project. (Sorry no pictures of the process.)


      What you'll need:
  • Piece of wood, any size you want.
  • Burlap to wrap around wood.
  • Staple gun & staples.
  • Contact paper.
  • Pumpkin outline printable (see below).
  • Scissors or exacto knife.
  • White craft paint.
  • Paint brush- I actually used a circular sponge stamper brush...


      How to:
  1. Iron any big creases out of burlap.
  2. Lay burlap on floor, and place wood on top of it.
  3. Wrap burlap to the back of your wood and staple in place. I staple parallel sides one after the other, and then switch to the other parallel sides, pulling taut as you go, but not too hard since burlap is a loose weave.
  4. Print out pumpkin to fit on your canvas with border room.
  5. Cut a piece of contact paper to fit the size of your board, trace pumpkin onto contact paper, cut out pumpkin, and set aside. Using the left behind contact paper, peel off backing and adhere to your burlap wrapped board. Make sure to press down well especially around the inner edges.
  6. Paint the negative space with white paint. With my circular sponge brush I dabbed paint, do not brush from side to side or the paint may seep under the edges of your contact paper.
  7. Once painted you can carefully remove contact paper.
  8. Set project aside to dry.

Enjoy!


Click on pumpkin above or HERE to download your pumpkin outline.

6.28.2012

Pallet Wood American Flag

Back in April I had this vision of a pallet wood American flag. Well actually, at first it was going to be a store bought wood flag, but I really wanted the distressed look to it. Then I realized, rather than me roughing up some smooth fresh boards, why not use boards that are already rough. So, the kids and I went pallet hunting. 

That thing was clean compared to the other options, but it still was quite dirty. I hammered and tugged and jumped on it until I got all of the boards separated. I ended up with 9 usable boards. Then I had to remove all of the gross nails. Then I sanded off the dark and dirty spots so that the paint would adhere good. I cut two of the boards down to 24" to put on the back to nail the front boards to- I just used the preexisting nail holes on the outer edges when I nailed it all together. The flag measures 25" x 40". 

I did all my work on the garage floor. I dream of a day when I can have a work bench with all of my tools in their own glorious places, but for now the floor works just great!

Then I gave it a rough while painting. I didn't worry about it being thick on the upper left corner because that would get painted blue.


Then, I taped off my stripes, and painted in between them red. After the red was dry, I taped off for my blue section, painted it and let it dry. After it was all dry and tape was removed, I sanded it all down to expose some wood and some of the white paint underneath. It looks nice and rustic and very patriotic.


I've considered putting a star in the upper corner, but until I figure out  the right one, I think it looks great just simple and plain.

6.19.2012

A Patriotic Mantle

I've been having a little too much fun lately with crafting projects. I have crafting injuries to prove it: hammered my thumb and got a nice blood blister, cut my finger on a tin can, burned my thumb while vigorously hand sanding a project, and when I was getting ready for bed, I noticed I had paint on my ear. All of these projects (and injuries) have paid off and lots of spaces and walls are getting decorated. I finished my Fourth of July mantle display and it's pretty fun and festive. I have one other element that might get added to it if I can make up my mind . . .

It's pretty simple, but we love looking at it and it gets us excited for Fourth of July festivities.


I made the patriotic bunting last year using scraps of red & blue fabric sewed together with binding. 

I made USA wood blocks using a 2x4 that I cut into 4x4 blocks. I painted them red, white, and blue, mod podged coordinating scrapbooking paper to the front side, distressed the edges, then stamped USA using craft paint.

The United States outline print is available for free download HERE.

I got the Pledge of Allegiance printable from eighteen25 HERE.

I made some pinwheels with scrapbook paper, glued them to lollipop sticks, and stuck them in tin cans.

5.29.2012

Father's Day Printable

Father's Day is just around the corner, and I'm already thinking about it. I usually am pretty much a slacker when it comes to celebrating Father's Day, and I feel pretty bad for my husband. So this year, I'm starting to think about it early, in hopes of making it a bit more special for him. I decided that I wanted the kids (well mostly my oldest) to fill out a questionnaire about Daddy. I could have printed a preexisting one, but instead I decided to design one myself. It prints as a 5x7 and would look really cute framed up for Dad.


 If you have any questions or need assistance, feel free to email me!


I can't wait to see what the kids answers are, and I hope their Daddy gets a little chuckle out of it as well.

5.14.2012

M&Ms for MOM

At my church, my husband and I used to teach a class of twelve 11 & 12-year-old children. They recently split our class, and I now solo teach the 4 girls. I love teaching them. I also get to be their Activity Days Leader along with the 10-year-old girls. Needless to say, I have so much fun thinking of ideas to do with them. Now that I only have 4 in my class on Sundays, I can do more handouts and fun activities/crafts. I was at the store on Saturday, and last minute decided to do something in class for their mothers. I saw the M&M bags and thought, "Hey, M&M . . . that's kinda close to MOM." So I grabbed 4 bags and came home. 

After putting the kids to bed, I started up Photoshop and got to work. I made a cute little MOM M&M label. Guess what, I making it available for free download.

*UPDATE: I have changed the file from the one pictured in use above to the accurate MOMs without an apostrophe. The file is available for download by clicking on the image below. Enjoy!


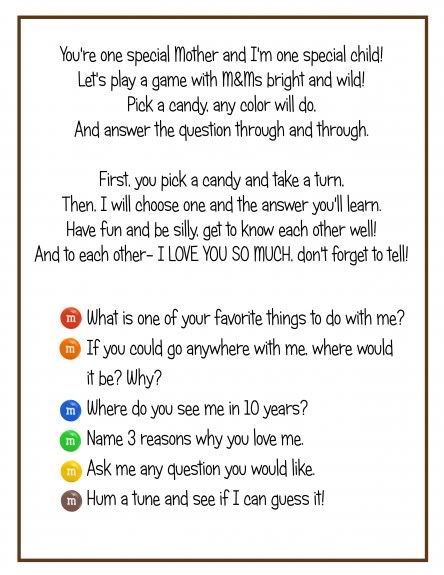
I searched on the internet to see what other M&M ideas were out there that involved Mothers. I came across this one:
It's a free downloaded printable from Over the Big Moon. It's a game for children to play with their moms while sharing a bag of M&Ms. The girls in my class packaged up their MOM bag of M&Ms with a printed copy of the game, tied it up with a little card they wrote. They were all so excited to share their gift and fun with their moms.

Hope you all had a great Mother's Day!

Amazon Affiliate