Showing posts with label DIY. Show all posts

2.19.2013

DIY Salvage Entry Table

In our home, we have a long entry wall. One so long that it dwarfed most entry tables. I found this one on Pottery Barn that I loved, but I would have to be crazy to pay that much for it. The main reason I browse most furniture catalogs is to merely get inspiration, and this table was the inspiration for the table I was to make.

One Saturday, we ventured to downtown Fort Worth to see if the architectural salvage warehouse, Discount Home Warehouse, had some balusters. I found some nice bulky ones and got four. They sat in my garage for a long time until I finally figured out what I wanted the top to look like, and how to make it. 

I made a little digital rendition of how I was going to attach the legs to the table. Since these weren't made to be table legs, they have a round top instead a a squared out one. So I adapted and it worked out great. I was going to have aprons that completely surrounded the table with the legs set behind the aprons. I mitered the corners and screwed them to the table top from the bottom side of each apron board with long wood screws. 


I used 1x6 whitewood boards to make the top. I pieced three boards together, wood gluing the first two, and then glued the third on. I then used a few metal brackets (called mending plates) and short wood screws on the underside to secure the three boards together even more. 

I had to sand down each leg to get rid of their glossy poly finish. Each leg had holes and notches from where they were attached- I decided to leave the holes to add character and remember that they were salvaged not store bought. Then, I painted primed them, let dry, then painted them. 

After the table top's glue dried, I cut and mitered the aprons and attached them to the table top. Then, following what I did in my digital sketch above, I cut some corner braces and screwed them into the aprons and then into each leg twice.  Once it was all together, I painted the top and aprons. I did a few coats and when they were thoroughly dry, I distressed the edges of everything. I let it all cure and then moved it inside.

Here's where it sits today:

I think it's fitting that a salvaged window from SMU hangs above it- salvaged friends. The table fits the space great and I have fun re-decorating it as each holiday comes along.

12.14.2012

JOY Blocks

A friend of mine was put in charge of the decorations for our church Christmas party. She quickly called me on board to come up with how to decorate the tables... all 30 of them!! With the budget we were given and the amount of tables we had to decorate, our options were limited. I could have crafted things for each table, but I wasn't really feeling up to the task of making 30+ handcrafted items per table (and craft supplies can be pricey too...) We just decided to make it easy, but still cute. We set out red and white poinsettias on each table, along with wood JOY blocks.

I followed the same basic idea as when I made the USA blocks for my Patriotic Mantle.

This time I bought 2"x3" boards instead of 2"x4" since the letter stamp I was going to use was tall and skinny and I didn't need the 4" width. I was just going to load the 3 boards into my van and cut them at home, but the friendly workers at HD offered to do it there.


69 blocks later, I was headed home. I then sanded all 12 edges of each block. Do the math... that's 828 edges. My hands were red, and I had two blisters afterwards. They I had my friend paint half of the blocks, and I (meaning I roped my hubs into helping) painted the other half. Once they were all painted I stamped J O and Y onto the blocks. DONE. I could have sanded and distressed the edges, but I had NO desire to sand those 828 edges again. (So much for keeping my crafting to a minimum.)


The morning of the party, my daughter and I went over to the church to decorate. We spread out the table cloths, put out the poinsettias, and then put the JOY blocks out. My daughter loved that part.


It was simple but nice. The best part was that we sent the poinsettias and blocks home with people to be given to neighbors, needy, or anyone to whom we felt like spreading some JOY!

12.11.2012

My Daughter's Bedroom

I posted the boys shared room a while back, and figured it was about time to post a few pictures of my daughter's room. I didn't really have a theme in mind- so it's a combination of girly pinks and greens, horse lover, shabby, and playful elements.


I made her bedding back when she was turning two and moving into a twin bed from the crib. See the original quilt post HERE. When we moved into this home, I could finally decorate a room, since before she was sharing it with baby brother.


I painted the back walls of this built in shelf area pink (Martha Stewart Living, Hollyhock Pink MSL007) to set it apart (and to compromise with my daughter since she wanted the whole room painted pink!)

Her blessing dress was the same dress me and my two sisters wore. It is too beautiful with so much history and sentiment behind it. We love seeing it each day.


The mirrors are cheap Ikea mirrors that were originally raw pine or dark stained wood. I gathered 9 from my unused home decor box and decided to paint them with wide stripes. I used extra pink paint from the shelves wall- so they coordinate perfectly.

I made the little dream catcher back when she was a baby. You can see details from the original post on it HERE.

I got her bed frame at a yard sale. That thing seemed like 100 years old, the rails were attached with some heavy-duty iron mechanism. I stripped the paint (I think there were at least 6 different colors on it from over the years.) It took some time, but it made the new antique white paint much smoother.

Her room is definitely girly and pink, but it was a lot of fun to put together. I mostly wanted it to be a room that SHE loved, and she does so it makes it all worth it!


Some art prints info from her room:
I Love to See the Temple- Have Joy designs on Etsy
Country Barn photo- Spencer Johnson on Etsy

11.08.2012

Halloween Costumes

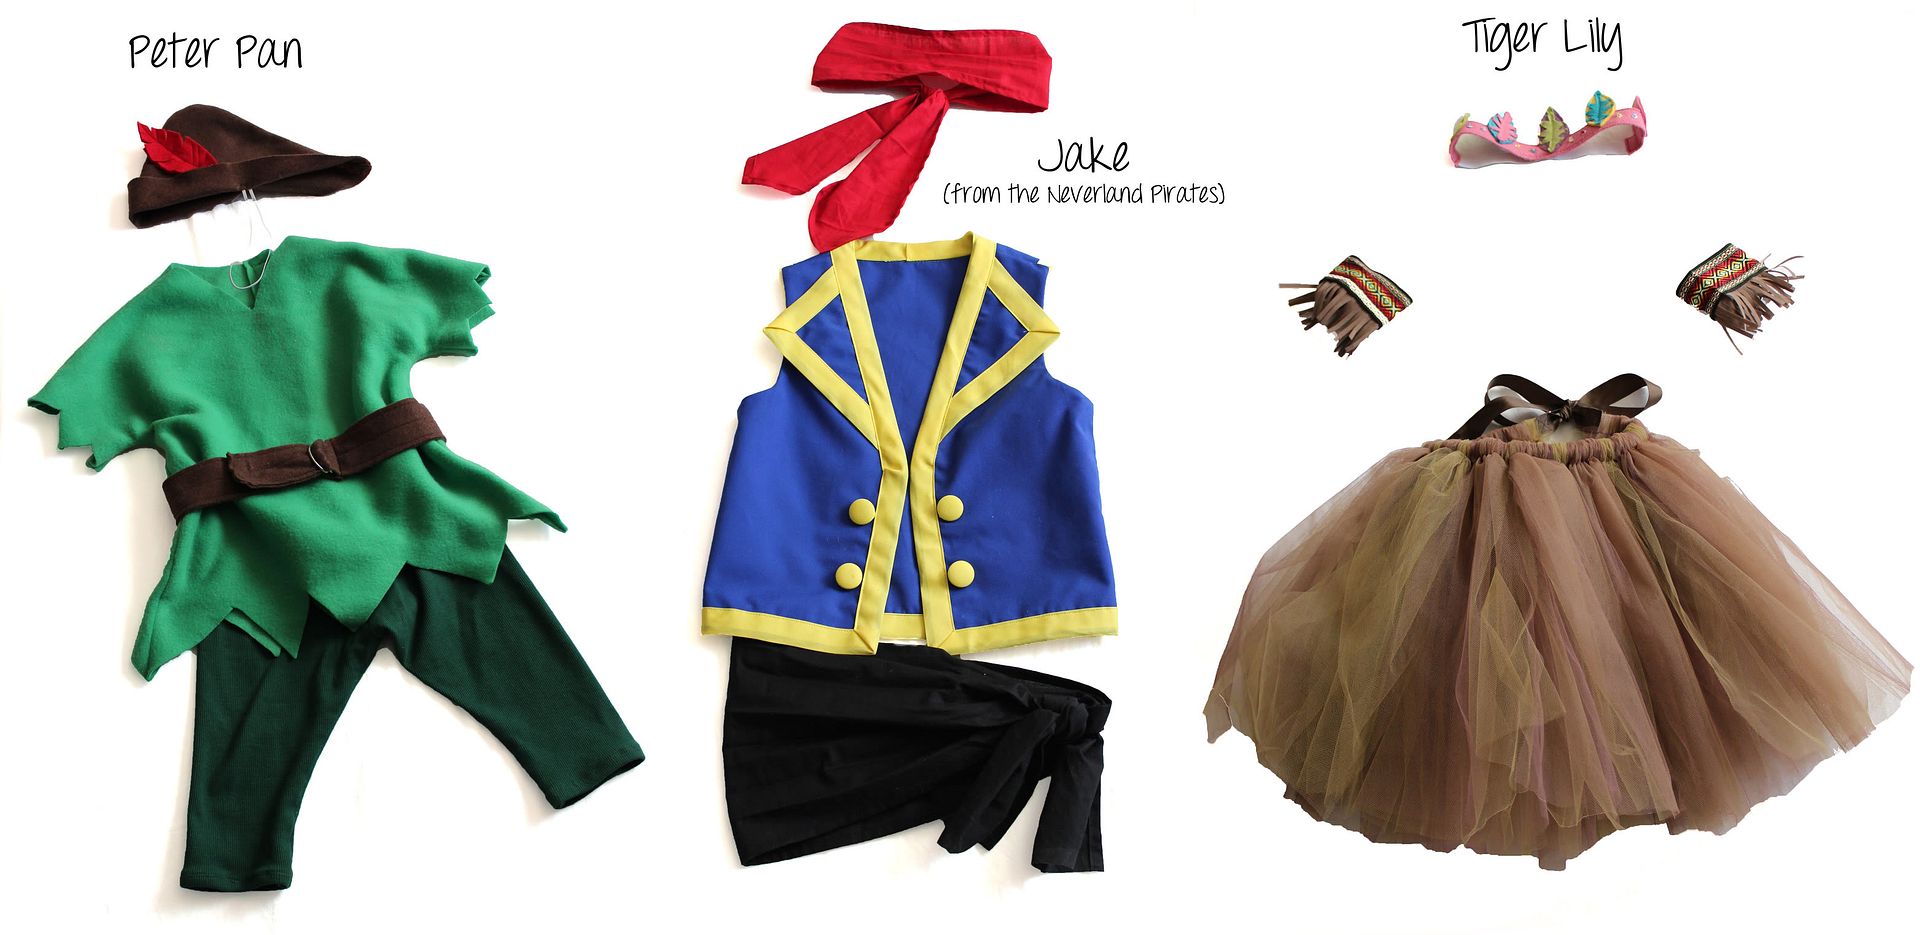
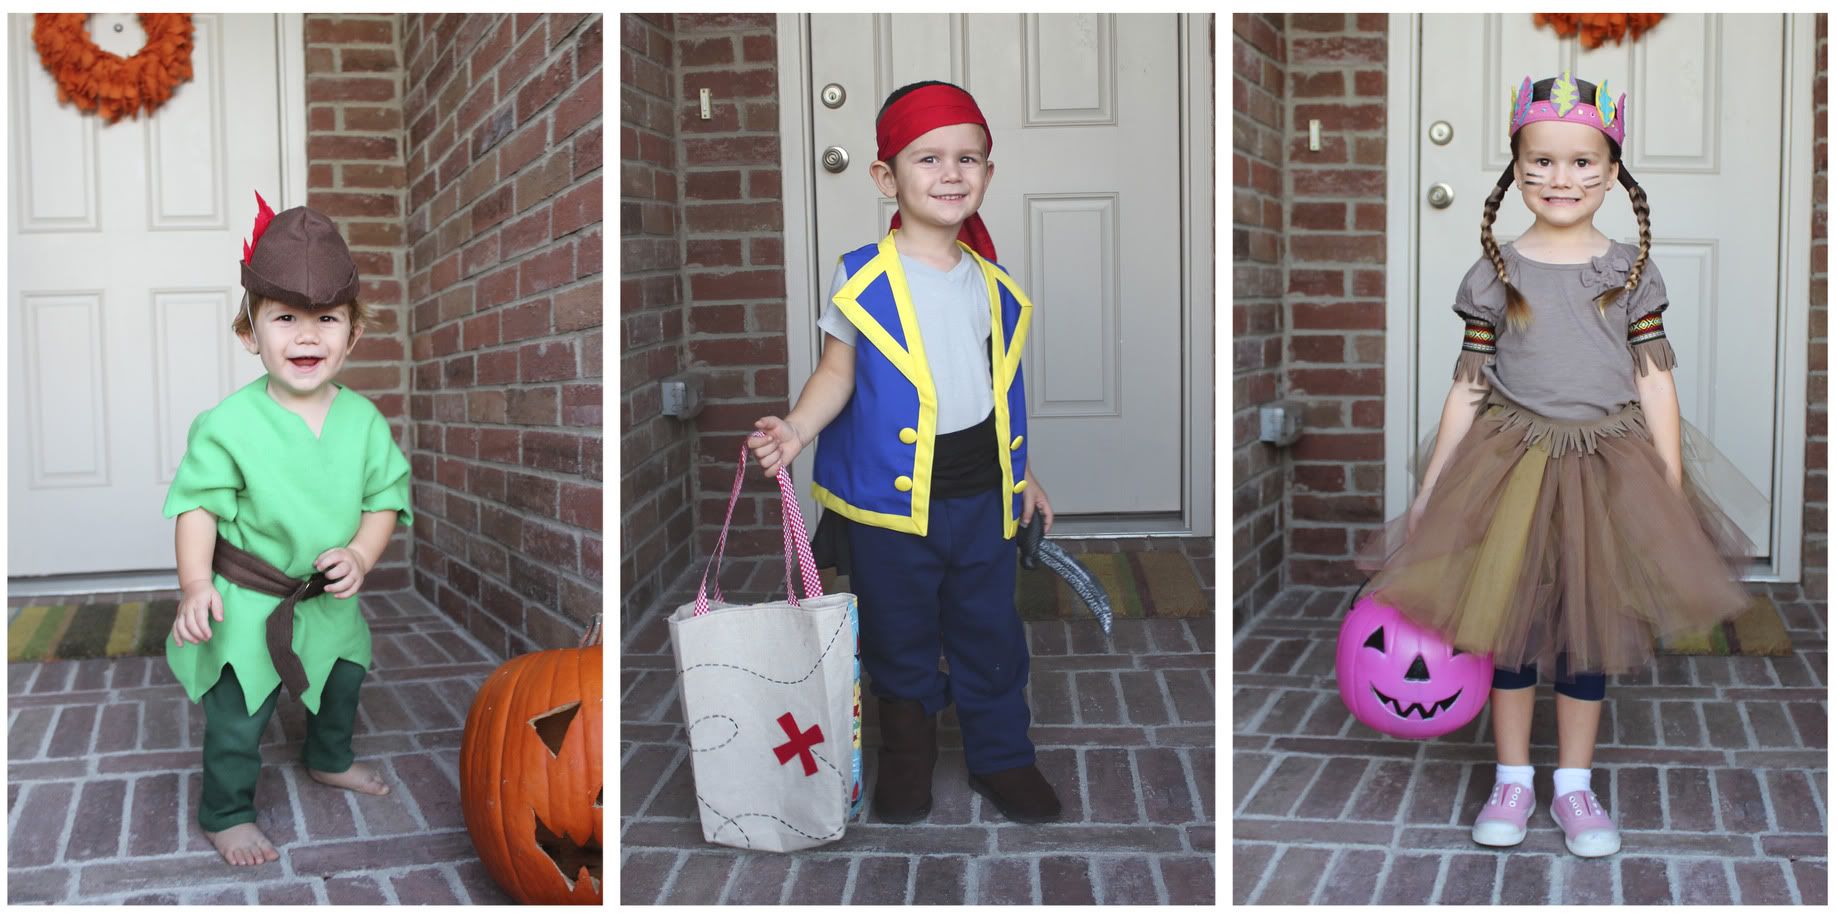
This year for Halloween, we dressed up as characters from Peter Pan, including Jake from Jake and the Neverland Pirates. I could have bought a majority of the costumes, but that's not in my nature, and I feel like a lot of the store bought options were flimsy and wouldn't stand up to my kids after more than a couple wears. These costumes would be put into their dress up bins, so I wanted them to last.

Here are the portions of the costumes that I made.
Peter Pan: I used this post on Make It and Love It as a guide. I made the leggings by just tracing some of my knit pants as a reference for size. 
Jake: I made the vest, head tie, and waist sash. The head tie and sash are just big rectangles with finished edges. For the vest I made a pattern on freezer paper, measuring my son as I went for size reference. I trimmed it out in yellow double fold binding, and added fabric covered buttons.
Tiger Lily: I made a simple tutu, fringe arm cuffs, and a felt feather headband. The tutu is made by cutting long strips of tulle, folding them in half and sewing 1" from the folded edge. I did this with each tulle piece and then fed elastic through the casing. I sewed ribbon the the two ends so that it can adjust even more as she grows.


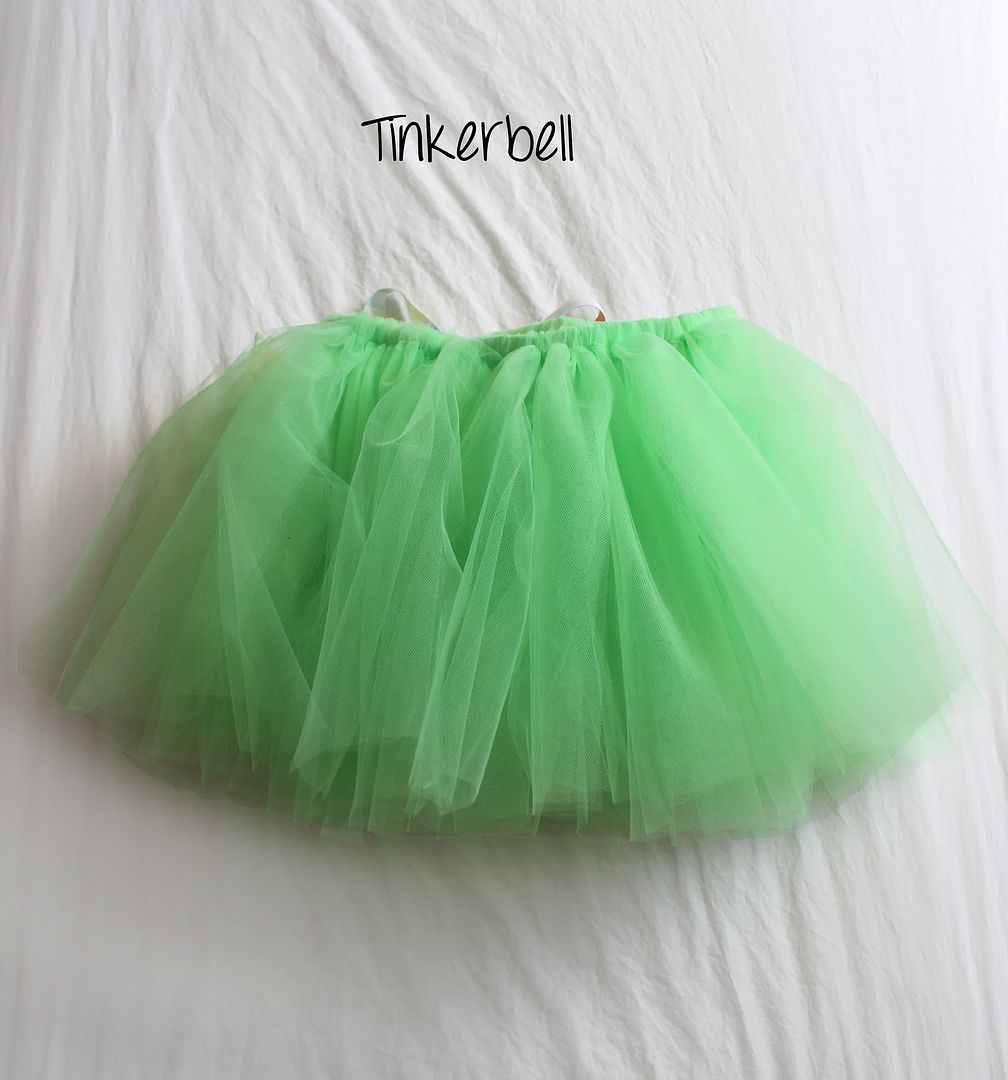
Tinkerbell: I made a green tutu following the same method above.

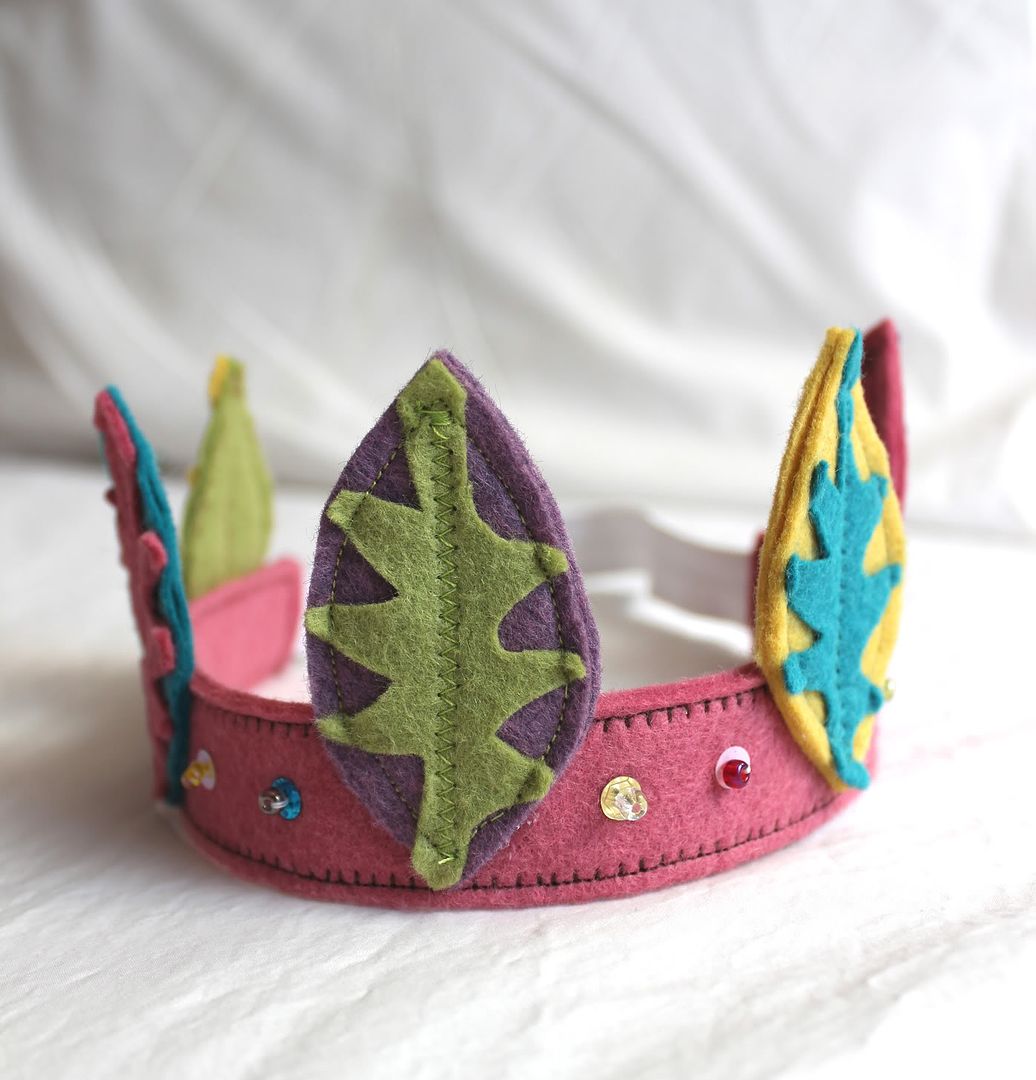
For Tiger Lily's headdress, I made a cute wool felt elastic headband. I cut three pieces for each feather, two as the base, and one as the feather fringe- then I sewed all three layers together. I embellished the band with sequins and beads.

To finish their looks I added a shirt, cheap sweatpants, and boots to the Jake costume, I also made him a pirate map treat bad; a shirt and leggings to the Tiger Lily costume, I also wrapped her braids in leather cording; wings, a bun, and clothes of course to my Tinkerbell costume.

Sorry no pictures of me as Tinkerbell, but the kids are the cute ones anyways. They had fun running from house to house, and collected way too much candy. They costumes have already been put to use several times since Halloween, so I really do hope they hold up well!

10.02.2012

New Lamp Revamp

After building my new entry table, I was on the hunt for a lamp. I had a vision in mind, but the lamps I kept falling in love with were way out of my price range. Like these:
Restoration Hardware: on sale for $145 not including the shade.


I knew just what to do. I headed over to HomeGoods where I knew they would have something that I could work with at a much better price. I found this lamp for $49. Yes, that price was a bit high still, but compared to the designer options, and the fact that I save money by building the entry table myself, I decided to splurge.
The shade was not what I wanted at all. I had another spare shade up in the attic- I think I paid $10 for it originally. I pulled it down and stuck it on. The shape was good, but the color wasn't working.

I had some extra burlap, and got to work recovering my lamp shade.


Using spray adhesive, I stuck the burlap to the shade and cut as I went. I left about an inch extra on the top and bottom that I would use to fold over afterwards. I also left about 2 inches extra to overlap the seams on the back of the shade. Using hot glue I folded over the seam edges and glued it down.
 

Then I used hot glue to fold over the top and bottom edges into the inside of the shade.

 I cut slits to fit around the shade supports.

I could have been a little more perfect, or added some ribbon to finish it off cleaner, but I'm lazy and figured it didn't really matter. In the end, it turned out exactly as I envisioned. In my opinion, it looks just as good as the expensive designer ones.

Let's do one last comparison:


10.01.2012

October Entry Table

It's the first day of October, one of our favorite months of the year, and we've got some Halloween decor to help us get even more excited. Here is my new entry table sprinkled with a few Halloween items. Before this year, I had maybe two festive decorations, I've been trying to be better this year, since my kids are really getting into the holiday.

I spotted the most adorable Halloween subway art on the wall of Jen from Tatertots & Jello in her Halloween Plate Wall post. After asking her where she got it, of course she admitted that she made it. So, since I couldn't just buy it, I too had to make one. I worked with a friend of mine to design the vinyl then she cut it for me. I had a board already the perfect size in my scrap stash. I painted it up, distressed it, and slapped on the vinyl. I painted a circle of chalkboard paint for the countdown section, and was done.


I don't own but one pumpkin. It's ugly, half the paint is chipping off, and I couldn't stand to bring it out of the box this year. So instead, I went to my fabric stash, picked out a few coordinating ones, and make some fabric pumpkins. They are fun and colorful, and probably the best thing about them, is the littles can pick them up, toss the around, lay on them, and I don't have to worry about them chipping, cracking, or breaking. I basically followed the tutorial HERE to make the pumpkins. 


I sprinkled a few glitter spiders about, and we are ready for Halloween. Okay, I have to admit, I'm working on a table runner too...

9.19.2012

A Ghosty Pillow

We love Halloween, mostly because it ushers in all of the holidays. I don't love the spooky aspect of Halloween, but the kids enjoy a little ghost, bat, or spider here and there. I went into my fabric stash, grabbed a pillow form I had in the closet, and made this friendly little ghost pillow.

 I kept the colors neutral, making it match the rest of my home decor a bit better.

Subtly spooky!

Sorry there isn't an in-depth tutorial, but I didn't take pictures as I went. But here's what I did: I cut out a simple ghost silhouette, used heat n' bond to adhere it to the fabric for the front side of the pillow, zig-zag stitched around the ghost, and made an envelope closure pillow cover. Here's a great tutorial from Freshly Picked for how to make an envelope pillow cover.

9.05.2012

Giant Chalkboard

Back to school was approaching and I found myself surrounded by school supplies and dreaming of chalkboards and freshly sharpened crayons. So on a whim, I decided to make a giant chalkboard before my oldest started kindergarten. My husband was out of town, so I loaded up the three kiddos, took out one of the seats to add some space for supplies, and headed to my favorite store- HD! 

I looked around at all the wood options, and found the perfect piece. I used a 5mm thick piece of underlayment measuring 4 feet by 8 feet. Underlayment is a plywood that is much smoother than regular plywood, plus it's thin and lightweight- perfect for hanging. I had a friendly worker cut it down to 3 feet by 6 feet. 

Then I picked out three 8 foot lengths of moulding to make a frame out of. This was the most expensive part of the project. I got some that was 89 cents a foot, but you can buy cheaper or more expensive depending on how much you want to spend and what you want the frame to look like.

Grab some chalkboard paint, 1- 30 ounce can is plenty, and a small high density smooth foam roller.

Supply List & Cost:
1 sheet of underlayment wood cut to 3'x6' - $10.85
24' of moulding - $21.36
Chalkboard paint - $9.67
Paint roller - $4.97

TOTAL- $50.72
(I had a giftcard, so my total was only $38)

Now load it all up, making an obstacle course of the van for the children.

After the kids went to bed, I spread out some plastic in the craft room and got painting. Following the instructions, I painted 3 coats of chalkboard paint on my underlayment. You have to wait 3 days before "seasoning" the board and using.

Then, I cut my moulding to make a mitered frame around my board. I just used liquid nails and clamps to attach the framing. When the frame is attached securely, do a finishing coat of paint and let dry.

My frame was done in time to use as a backdrop for my daughter's first day of school. (Well, I actually used the frame before I did the finishing coat of paint on the frame . . .) I had her write her name, and plan on taking subsequent pictures each year to compare.

Just last night, we hung the frame up on the wall so that we can doodle away. I simply countersunk some screws right through the frame into the studs in the wall. Putty up the holes and do some touch-up paint.

We keep some chalk in a jar, and made sure to mount it not above carpet, so the chalk dust can be easily wiped up. I have as much doodling on it as the kids do!


8.30.2012

HELLO Entry Signage

We have lived in our home for 2 1/2 years now, and up until this week, our entry wall has been bare. I always wanted an entry that was cheery and inviting, but plain beige walls, were not the most welcoming sight. I thought about simply cutting a board and painting or doing vinyl that said "Welcome" but that was too typical for me. So I came up with this instead:

I just bought unfinished wood letters, painted them white, and distressed the edges a smidge.

Then, using Command's picture hanging strips (the velcro-like ones) I mounted them on the wall. The strips make the letters pop away from the wall just a tad, adding a little more dimension, which I love.

Hopefully now, when people come over, they will feel happily welcomed into our home!


What do you have in your entry?

7.08.2012

Herringbone Nails

A few weeks ago I posted this picture on Instagram:

After posting I had questions: Did you do that yourself? Is that done by hand? Will you show me how you did it? So here's a little tutorial.


You will need:

Basecoat (I used Sally Hansen Xtreme wear in Sun Kissed)
Sally Hansen nail art pen in white
Clear topcoat (I used OPI topcoat)

1. Paint 2 coats of your top coat color. Allow to dry completely hard.
2. Shake nail pen and follow instructions to get paint flowing. Start by painting up and down lines on each nail. I do two on the big toe, and one on the little ones.
3. Paint angled lines in between straight lines, alternating direction.
4. Paint clear top coat and admire!


6.28.2012

Pallet Wood American Flag

Back in April I had this vision of a pallet wood American flag. Well actually, at first it was going to be a store bought wood flag, but I really wanted the distressed look to it. Then I realized, rather than me roughing up some smooth fresh boards, why not use boards that are already rough. So, the kids and I went pallet hunting. 

That thing was clean compared to the other options, but it still was quite dirty. I hammered and tugged and jumped on it until I got all of the boards separated. I ended up with 9 usable boards. Then I had to remove all of the gross nails. Then I sanded off the dark and dirty spots so that the paint would adhere good. I cut two of the boards down to 24" to put on the back to nail the front boards to- I just used the preexisting nail holes on the outer edges when I nailed it all together. The flag measures 25" x 40". 

I did all my work on the garage floor. I dream of a day when I can have a work bench with all of my tools in their own glorious places, but for now the floor works just great!

Then I gave it a rough while painting. I didn't worry about it being thick on the upper left corner because that would get painted blue.


Then, I taped off my stripes, and painted in between them red. After the red was dry, I taped off for my blue section, painted it and let it dry. After it was all dry and tape was removed, I sanded it all down to expose some wood and some of the white paint underneath. It looks nice and rustic and very patriotic.


I've considered putting a star in the upper corner, but until I figure out  the right one, I think it looks great just simple and plain.

Amazon Affiliate